Sponsored By


728x90
신림 순대타운


728x90

'ETC > 먹방' 카테고리의 다른 글

2019. 08. 08. 목. 저녁.  (0) 2019.08.08
2019. 08. 07. 수. 저녁.  (0) 2019.08.07
2019. 08. 01. 목. 저녁.  (0) 2019.08.02
2019. 07. 31. 수. 저녁.  (0) 2019.07.31
2019. 07. 28. 일. 점심  (0) 2019.07.28
728x90

Throw 예외처리 하는 방법임.


ㅁ. 간단할 설명.

'divide();' 에서 일을 다 처리하기 때문에 정작 메인에서는 알 수가 없다.

따라서, 'divide2();' 에서 작업을 시킨다음에 그 작업내역을 메인으로 던져서(throw) 메인에서 일(TryCatch)을 할 수 있게 한다.


00. 'divide(){}' 를 평소처럼 만들고 'divide2(){}' 는 만들때 throws Exception을 써서 만들어보자.

     하지만, 메인메소드에 적을때에는 'divide2();' 를 try~catch 내부에 넣어야 함을 잊지말자.


01. 결과값.


※. 코드


public class Test {


public static void main(String[] args) {

// TODO Auto-generated method stub


divide();


try {

divide2();

} catch (Exception e) {

// TODO: handle exception

System.out.println("main Reason : " + e.getMessage());

}


}


public static void divide2() throws Exception

{

int a = 2;

int b = 0;

int result;


result = a/b;

System.out.println("result = " + result);

}


public static void divide()

{

int a = 2;

int b = 1;

int result;


try {

result = a/b;

System.out.println("result = " + result);

} catch (Exception e) {

// TODO: handle exception

System.out.println("Reason : " + e.getMessage());

}


}


}


728x90
728x90


Thread(동시동작, 멀티태스킹) 사용방법.


ㅁ. 쓰레드는 일반적으로 


1. Thread 클래스를 상속받아서 사용하는 경우

자바가 단일상속만 허용하기 때문에 Thread를 상속받는 순간 다른 클래스를 이용할 수 없어서, 

  사용에 제한이 있을 수 있다.

2. Runnable interface를 구현하는 방법이 있다.

interface를 사용하기 때문에, 필요한 경우에 다른 클래스를 상속받아서 사용할 수 있다. 


따라서, 일반적으로는 Runnable interface를 구현하는 방법으로 사용한다.


00. Runnable 인터페이스를 implements 하면 run()메소드를 오버라이드 해야한다. 

     run()메소드안에 구동될 코드를 작성하면 된다.


01. 메인 클래스에 객체를 생성하고 생성한 객체를 쓰레드속에 넣어서 구동 '.start();' 시켜주면된다.


02. 1,3,5초에 맞춰서 각각 작동됨을 확인할 수 있다.


728x90
728x90

예외처리 두번째 방법임.


ㅁ. 간단할 설명.

'readMessage();' 에서 일을 다 처리하기 때문에 정작 메인에서는 알 수가 없다.

따라서, 'readMessage2();' 에서 작업을 시킨다음에 그 작업내역을 메인으로 던져서(throw) 메인에서 일(TryCatch)을 할 수 있게 한다.


01. 


※. 코드


import java.io.IOException;


public class Test {


public static void main(String[] args) {


String msg;


// 호출당한 readMessage()에서 예외처리

msg = readMessage();

System.out.println("msg = " + msg);


// readMessag2() 문제발생하면 처리하지 않고,

// 나한테 알려만 주기때문에,

// 내가 예외 처리해줌.

try {

msg = readMessage2();

} catch (IOException e) {


System.out.println("Reason : " + e.getMessage());

}


}// main


// 호출 당한 함수는 문제가 발생하면 처리하지 않고,

// 나를 호출한 함수한테 알려주는 방법.

public static String readMessage2() throws IOException

{

byte[] buffer = new byte[1024];

System.out.println("문자열을 입력하시오.");

System.in.read(buffer);

return new String(buffer);

}


// 호출을 당한 함수가 예외 처리하는 경우

public static String readMessage()

{

//return "Hello ~~";

byte[] buffer = new byte[1024];

System.out.println("문자열을 입력하시오.");


// 키보드의 입력은 OS는 모두 파일로 인식

try {

System.in.read(buffer);

} catch (IOException e) {


System.out.println("Reason : " + e.getMessage());

}


return new String(buffer);

}


}// Main Class


728x90
728x90


예외처리 하는 방법임.


오류가 날것같은 코드에 try ~ catch 문을 씌워서 에러가 나면 catch를 실행하게 하는 방법이다.


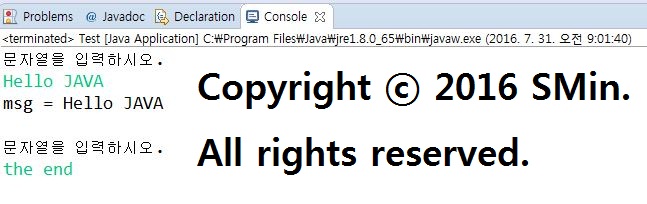
00. 간단하게 나누기로 예를 들었다. try~catch문을 써서 실행하면 일반 출력값과 차이가 없음을 볼 수 있다.


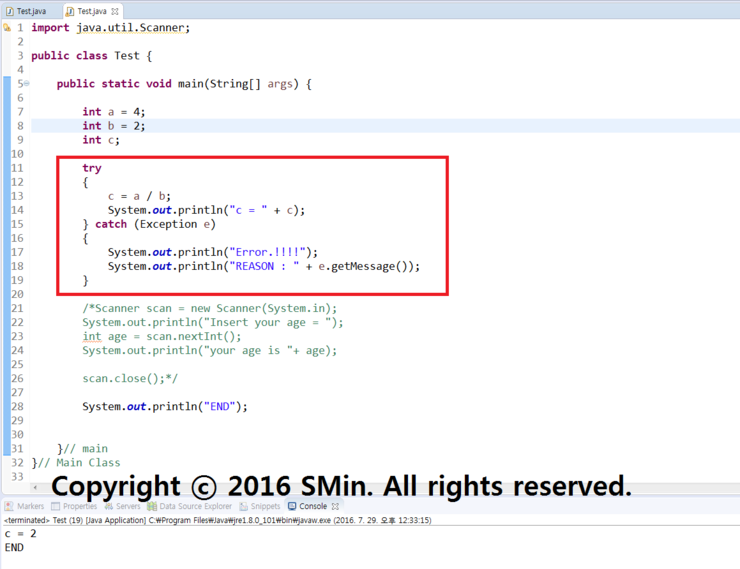
01. 하지만, b값에 0을 두면 에러가 나기때문에 catch쪽으로 넘어가게 된다. 

    이때, 'e.getMessage();' 를 쓰게되면 에러 이유가 나오게 된다.


02. 'e.printStackTrace();' 를 사용하면 이유와 설명등을 함께 볼 수 있다.


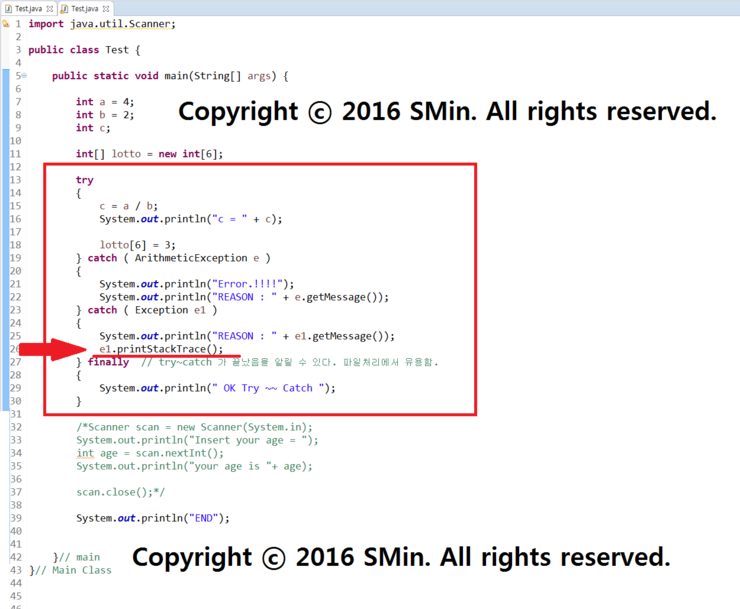
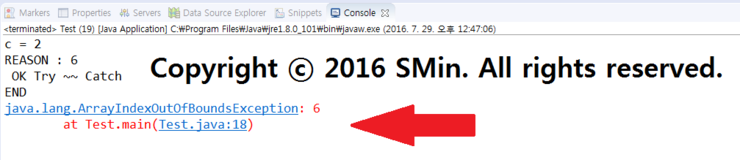
03. 결과값. 해석하면 바운더리를 초과했다는 뜻이다. 

    우리가 배열을 만들때 6개 짜리를 만들었으니 0~5 만큼 인데 

    [6] 자리에 3을 넣으려고 하니 6자리가 없다고 에러가 난 것이다.


※. 코드


import java.util.Scanner;


public class Test {


public static void main(String[] args) {


int a = 4;

int b = 2;

int c;


int[] lotto = new int[6];


try 

{

c = a / b;

System.out.println("c = " + c);


lotto[6] = 3;

} catch ( ArithmeticException e ) 

{

System.out.println("Error.!!!!");

System.out.println("REASON : " + e.getMessage());

} catch ( Exception e1 )

{

System.out.println("REASON : " + e1.getMessage());

e1.printStackTrace();  

} finally  // try~catch 가 끝났음을 알릴 수 있다. 파일처리에서 유용함.

{

System.out.println(" OK Try ~~ Catch ");

}


/*Scanner scan = new Scanner(System.in);

System.out.println("Insert your age = ");

int age = scan.nextInt();

System.out.println("your age is "+ age);


scan.close();*/


System.out.println("END");


}// main

}// Main Class


728x90


Sponsored By


+ Recent posts